Free setup! Speak with us anytime: 480-624-2500
Scheduling a Campaign to Send Later
You know how to send a mailing in Email Marketing, already. You can also schedule mailings to send, at some point in the future. This is helpful to streamline your workflow, or take care of a bunch of sends all at once. Here's to efficiency and planning!
Before you do anything else, confirm your Time Zone settings in the Account area. Click on "Account" to check this. After your Time Zone is confirmed:
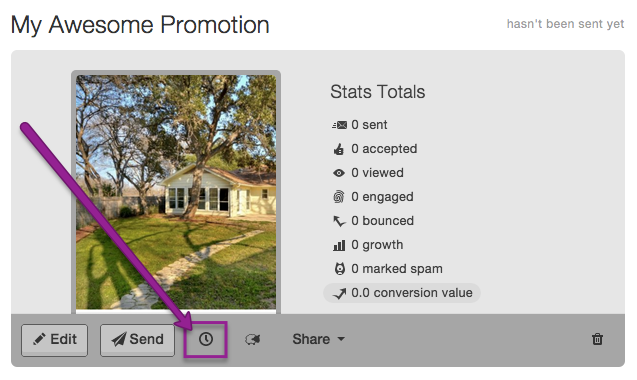
Back on the Dashboard, click the little clock button below the thumbnail of the campaign you’re wanting to send. It's to the right of the Send button.

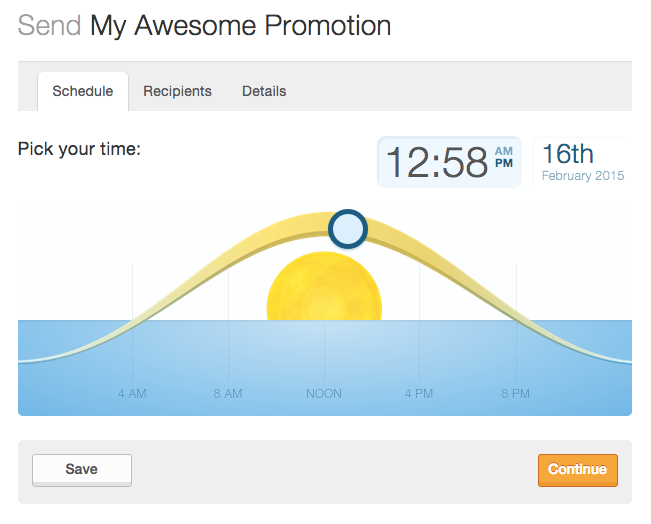
Now, Email Marketing will walk you through the 3 steps to schedule your mailing. The first tab you see is called Schedule and that's where you select the time and date that you want the mailing to send.

You can drag the circle marker along the daytime sun path to pick a time of day. Or, you can simply click into the display time at the top right, and type in the time you want your mailing to send. Be sure to pick AM or PM, correctly!
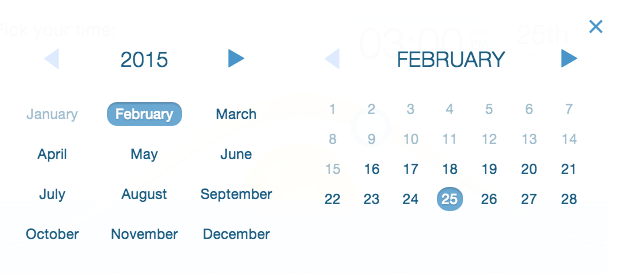
Click the date display in the top right, to choose the day you want your mailing to send.

The date and time combination that you select must be in the future. If you run into any error messages about your time & date not being in the future, but you're sure it is, double check your time-zone settings, in your Account area.
Click the Continue button when you've chosen your future time and date for your scheduled mailing. The rest of the tabs are exactly like when sending a mailing directly, without scheduling it.
The next tab you see is called Recipients, and this is where you choose which subscriber lists you want to send this mailing to. Click Include to send the mailing to that list, including as many lists as you want. Use the Exclude button only if you overlap among lists, and you want to make sure that the overlapping folks do NOT receive the mailing. You can click Include for the "All Subscribers" if you want to just send it to everybody in your subscribers.
Confirm your recipient details and then click the Continue button at the bottom or right of the page.
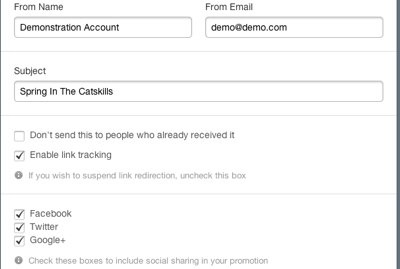
The next tab you see is called Details and contains all your mailing details, such as the 'from' display name and email address, and the subject line. All of which are editable, right here, on this page.

Confirm that your mailing details, including your social sharing options, are correct, and then click the Schedule button to finalize the mailing. You'll have one last chance to double check all your schedule details, before you confirm.
Now you’re done! Just click Looks Good. Schedule it! and Email Marketing will send it for you at the time you chose.
You will be returned to your Dashboard, and the clock button will be red now, if the mailing is successfully scheduled.

You can always edit or delete your existing schedules. Simply click on the red clock button under any campaign, to view the scheduled mailings for that campaign. Click the pencil icon next tot he schedule you want to edit.
You will be able to edit all the details in any of those 3 tabs. You'll see the exact same screens that you saw before, when creating your schedule, originally.
Click the trashcan button to delete the scheduled mailing, completely. If you have no scheduled mailings, none of your clock buttons will be red.
Domain Registration
Pay less for website domain names. Register your own .com, .net or .org for as low as $10.18 per year. We have everything you need to get online with your new domain.Website Builder
For as little as $3.89 per month you can build your Website online with Website Builder using our easy to use professional templates. Play Video - Demo
Quick Shopping Cart
Build and run your own successful online store in minutes. You're just five easy steps away! Shopping Cart works with Google® and eBay® Play Video
Website Hosting
Everything needed to give your website the high-performance home it deserves. Protect transactions and secure your customer's data with a SSL Certificate
