
Free setup! Speak with us anytime: 480-624-2500
Set up a Linux Desktop with GNOME and VNC
Some of the information in this article is advanced material we make available as a courtesy. Please be advised that you are responsible for properly following the procedures below. Customer Support cannot assist with these topics.
You can set up quick and secure desktop access to your Linux dedicated server environment using Virtual Network Computing (VNC) and a secure connection between the server and the desktop.
Be sure to complete all steps below to ensure a secured connection. VNC is unencrypted and not safe over an open network, so all steps below are required to set up and secure the connection.
These instructions are for Linux servers running CentOS 6 or Fedora only.
Step 1 — Installing GNOME and VNC
This step contains two installations: first, the GNOME desktop environment group; second, the VNC Server package. Both are installed using yum, which is available on your Linux dedicated server.
To Install GNOME and VNC
- Log in to your Linux dedicated server as root user via SSH (Secure Shell Protocol).
- Type the following, and then press Enter. The process takes a few minutes to complete:
yum -y groupinstall Desktop
- Type the following, and then press Enter:
yum -y install tigervnc-server
TIP: Using yum makes these installation steps quick and clean.
Your desktop environment is now installed and so is VNC, which you use to access it.
Unfortunately, GNOME installs a service called NetworkManager. This service needs to be removed because it overwrites our local nameserver settings, which will cause you DNS issues for domains hosted on your server. To remove NetworkManager, issue the following command:
After removing NetworkManager, you might want to check to see if your DNS resolvers are still valid by viewing the /etc/resolv.conf file. It should have two entries with a structure similar to this:
nameserver [ip address]
If you see that this file has been overwritten by NetworkManager, please contact us through chat so we can give you the correct DNS resolvers.
Step 2 — Configuring VNC for Remote Access to the Desktop
Here are the configuration steps required to access your desktop through VNC.
To Configure a VNC User
- Log in to your Linux dedicated server (via SSH) as the user you want to use to access VNC.
- Type the following, and then press Enter:
cd ~/
- Type the following, and then press Enter. You are prompted to enter and confirm the VNC password for this user:
vncpasswd
When you access the desktop through VNC, use your VNC password to establish the VNC connection, and then the user's password to access the desktop environment.
To Edit the VNC Configuration File
This process configures VNC to further secure connections to the desktop, set the base size to render the desktop, and identify the port to be used for remote desktop connections.
- Log in to your Linux dedicated server as root user via SSH.
- Using any plain text editor, open /etc/sysconfig/vncservers.
- Add the following two entries to the file and save it. IMPORTANT: Replace "yourvncuser" with the user name you want to use to access the desktop:
VNCSERVERS="1:yourvncuser"
VNCSERVERARGS[1]="-geometry 1024x768 -localhost"
These settings configure the following:
- 1 — This indicates the port used for the VNC connection. Only the last digit is entered and the first three are implicit. For example, 1 defines port 5901. 9 indicates use of port 5909.
- 1024x768 — This sets the size that VNC renders your desktop. You can optionally change it.
- -localhost — This option limits VNC to allow only local connections. This setting makes the VNC connection more secure when used in conjunction with an SSH tunnel. SSH tunnel setup is in the next section.
To Start the VNC Server and Verify That It's Running
- Log in to your Linux dedicated server as root user via SSH.
- Type the following, and then press Enter.
/sbin/service vncserver start
- Type the following, and then press Enter.
/sbin/chkconfig vncserver on
TIP: Use this last command at any time to verify that the service is started. After a reboot, for example.
You've now completed configuration of VNC. The next step is to set up the secure SSH tunnel to access your Linux desktop.
Step 3 — Configuring a Secure Connection to the Linux Desktop
To securely access your desktop, you need to use an SSH tunnel to your server. The easiest method is to use PuTTY and save the configuration for use each time you access the server.
To Configure a Secure Connection to Access the Linux Desktop
These instructions assume that you have a stored PuTTY session to connect to your Linux dedicated server. If you do not, consult PuTTY help documentation to create a session.
- Open PuTTY, select the saved session, and then click Load.
- In the Category section, from Connection click SSH, and then click Tunnels.

- Type and enter the following, and then click Add:
- Source port — Type 580, plus the port you specified in the VNC configuration file. Because we used port 1 in that example, here we would enter 5801.
- Destination — Type 580, plus the port you specified in the VNC configuration file. Because we used port 1 in that example, here we would enter 5801.
- Type and enter the following, and then click Add:
- Source port — Type 590, plus the port you specified in the VNC configuration file. Because we used port 1 in that example, here we would enter 5901.
- Destination — Type 590, plus the port you specified in the VNC configuration file. Since we used port 1 in that example, here we would enter 5901.

- In the Category section, navigate to Session.
- In the Saved Sessions field, type VNC Tunnel, and then click Save.
Step 4 — Accessing the Linux Desktop
Each time you access the Linux remote desktop, you open the SSH tunnel you configured in Step 3, and then open an Internet browser that has Java applets enabled to log in to VNC.
To Access the Linux Desktop
You'll access the Desktop with a VNC client. If you're not sure of one to use, we recommend:
These instructions assume that you have a stored PuTTY session to connect to your Linux dedicated server. If you do not, consult PuTTY help documentation to create a session.
- Open PuTTY, select the saved session, click Load, and then log in to your server. This opens the SSH Tunnel that you configured in Step 3.
- Open your preferred VNC Client, type http://localhost:590[n] (where [n] is the port you specified in the VNC configuration file, and then press Enter.
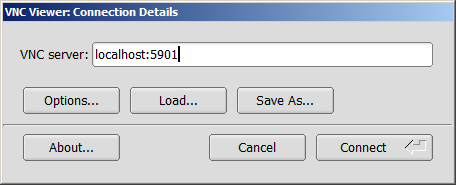
This opens a secure connection from your Linux server to your desktop and you should see a screen similar to the one below.

(Optional) Step 5 — Removing GNOME and VNC
After completing the process, you might want to remove the GNOME desktop environment group and VNC Server package. Both are removed using yum, which is available on your Linux dedicated server.
To Remove GNOME and VNC
- Log in to your Linux dedicated server as root user via SSH (Secure Shell Protocol).
- Type the following, and then press Enter. The process takes a few minutes to complete:
yum groupremove "GNOME Desktop Environment"
- Type the following, and then press Enter:
yum remove tigervnc-server