
GoWebsite provides Domain Registration,
Website Hosting,
On-Line Shopping Carts,
SEO, WordPress
Hosting, Email Accounts,
SSL Certificates,
Website Builder & other
Web Development Products.
Free setup! Speak with us anytime: 480-624-2500
Free setup! Speak with us anytime: 480-624-2500
Adding, Deleting, and Organizing Pages
With Website Builder version 6, you can add and publish as many Web pages as your account allows. You can also delete pages you no longer want. To better organize your Website, you can arrange the order in which your pages display and choose not to publish specific pages.
If your account uses a .mobi domain name, you can only add mobile pages. You can't add traditional pages. For information about adding mobile pages, see Adding Mobile Pages.
- Log in to your GoWebsite account.
- In your Products list click Website Builder, and then click Manage next to the account you want to use.
- Click Design Your Pages.
- Click Pages, and then select Add Pages.
- Select the type of page you want to add, and then complete the appropriate steps:
- Blank Page — To add a page without content, select Blank Page.
- Pre-Built Page — To add a page with content from a pre-built template, go to the Category menu, and then select a category. From the Page menu, select a pre-built page.
- Copy of existing page — To add a copy of one of your existing pages, select the copy.
- Photo page — Adds a page optimized for an image gallery.
- Blog page — Adds a page optimized for a blog.
- Click Add Page.
- In the Page Title field, enter a title.
- From the Copy navigation from menu, select a page to copy.
- If you want to add the page your Website's navigation menu, select Include in Website navigation.
To add multiple pages, click Add Page again and then complete the fields.
- Click OK.
To Delete Multiple Pages
- Log in to your GoWebsite account.
- In your Products list click Website Builder, and then click Manage next to the account you want to use.
- If you are working in the Page Designer, click Exit Designer.
- From the Manage menu, select Organize Website .
- Click the Red X next to the pages you want to delete, and then click OK to confirm the deletion.
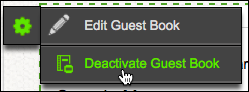
To delete a Guest Book page, click the page's left-side gear button and choose Deactivate Guest Book.
To Delete a Page
- Log in to your GoWebsite account.
- In your Products list click Website Builder, and then click Manage next to the account you want to use.
- In the Jump to page: menu, select the page you want to delete. The Page Designer opens.
- If you are working in the Page Designer, select the page you want to delete.
- From the Pages menu, click Delete Page.
- Click OK to confirm the deletion.
To Organize Pages
- Log in to your GoWebsite account.
- In your Products list click Website Builder, and then click Manage next to the account you want to use.
- If you are working in the Page Designer, click Exit Designer.
- From the Manage menu, select Organize Website .
- To change the order of your pages, select and drag pages in the order you want them to display.
- To set one of your pages as the home page, select the page, and then select Make this page the Home Page.
- To exclude one of your pages from being published, select the page, and then select Do not publish this page.
- To change properties for a page, select the page, and then do the following:
- In the Navigation Title field, enter the name you want to display on the button that links to it.
- In the Browser Title field, enter the title you want to display in browsers.
- In the Heading Title field, enter a heading for the page.
- In the Filename field, enter a name to display in the page's URL.
- To automatically reset the navigation buttons to reflect the changes, select Restore default navigation.
This will overwrite any settings or subnavigation you added from the Edit Navigation page.
- Click OK.
- To confirm your changes, click OK.
Next Step
Domain Registration
Pay less for website domain names. Register your own .com, .net or .org for as low as $10.18 per year. We have everything you need to get online with your new domain.Website Builder
For as little as $3.89 per month you can build your Website online with Website Builder using our easy to use professional templates. Play Video - Demo
Quick Shopping Cart
Build and run your own successful online store in minutes. You're just five easy steps away! Shopping Cart works with Google® and eBay® Play Video
Website Hosting
Everything needed to give your website the high-performance home it deserves. Protect transactions and secure your customer's data with a SSL Certificate
Copyright © 2005 - 2020. All rights reserved.
Privacy Policy