GoWebsite provides Domain Registration,
Website Hosting,
On-Line Shopping Carts,
SEO, WordPress
Hosting, Email Accounts,
SSL Certificates,
Website Builder & other
Web Development Products.
Free setup! Speak with us anytime: 480-624-2500
Free setup! Speak with us anytime: 480-624-2500
Add an SRV Record
SRV (Service) records are resource records used to identify computers that host specific services, such as FTP. For example, a client might issue a request for the SRV Record to find the host name that provides the service for a specific domain name. The service might be used on that domain name or a different one might call it.
- Log in to your GoWebsite account.
- Next to Domains, click Manage.
How you now access the DNS manager will depend on the view of your account:
If your domain is registered at another company, see the Domains registered at another company section below for instructions.
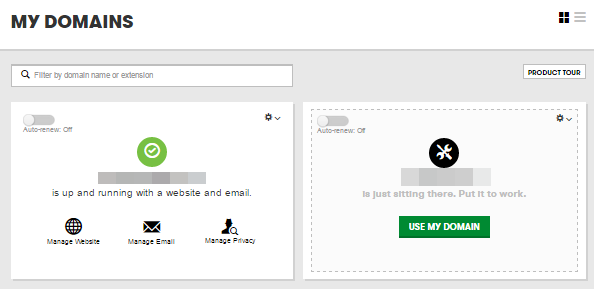
Card View
In Card View, your account will look something like this:

- Select the domain name you want to use, click
 (Settings) and select Manage DNS.
 - At the bottom of the Records section, click Add and select SRV from the menu.
- Complete the following fields:
- Service — Enter the service name of this SRV record. The name should begin with an underscore, such as _ldap, _ftp, or _smtp.
- Protocol — Enter the protocol the service uses. The name should begin with an underscore, such as _tcp or _udp.
- Name — Enter the host name or domain name the SRV links to, such as server1. If you want to link the record to your domain name, type @.
- Priority — Select the priority for the SRV record. For multiple records that have the same Name and Service, clients use the priority number to determine which Target to contact first.
- Weight — Select the weight of the SRV record. For multiple records that have the same Name, Service, and Priority, clients use the weight number to determine which Target to contact first.
- Port — Enter the port number for the service, such as 80 or 21.
- TTL — Select how long the server should cache the information.
- Click Save
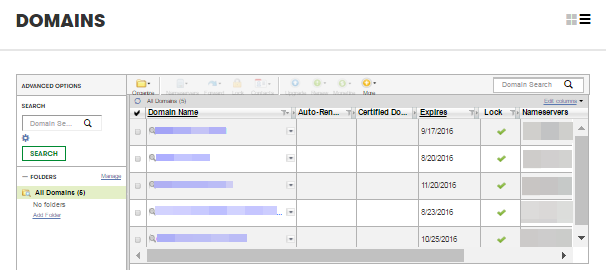
List View
In List View, your account will look something like this:

- Click on the domain name you want to use.
- Select the DNS Zone File tab.
- Click Edit:
- At the bottom of the Records section, click Add and select SRV from the menu.
- Complete the following fields:
- Service — Enter the service name of this SRV record. The name should begin with an underscore, such as _ldap, _ftp, or _smtp.
- Protocol — Enter the protocol the service uses. The name should begin with an underscore, such as _tcp or _udp.
- Name — Enter the host name or domain name the SRV links to, such as server1. If you want to link the record to your domain name, type @.
- Priority — Select the priority for the SRV record. For multiple records that have the same Name and Service, clients use the priority number to determine which Target to contact first.
- Weight — Select the weight of the SRV record. For multiple records that have the same Name, Service, and Priority, clients use the weight number to determine which Target to contact first.
- Port — Enter the port number for the service, such as 80 or 21.
- TTL — Select how long the server should cache the information.
- Click Save
Domains registered at another company
- From the top menu, click the DNS tab, and select Manage Zones.
- Enter the domain name you want to use and click Search.
- At the bottom of the Records section, click Add and select SRV from the menu.
- Complete the following fields:
- Service — Enter the service name of this SRV record. The name should begin with an underscore, such as _ldap, _ftp, or _smtp.
- Protocol — Enter the protocol the service uses. The name should begin with an underscore, such as _tcp or _udp.
- Name — Enter the host name or domain name the SRV links to, such as server1. If you want to link the record to your domain name, type @.
- Priority — Select the priority for the SRV record. For multiple records that have the same Name and Service, clients use the priority number to determine which Target to contact first.
- Weight — Select the weight of the SRV record. For multiple records that have the same Name, Service, and Priority, clients use the weight number to determine which Target to contact first.
- Port — Enter the port number for the service, such as 80 or 21.
- TTL — Select how long the server should cache the information.
- Click Save

Next Step
Domain Registration
Pay less for website domain names. Register your own .com, .net or .org for as low as $10.18 per year. We have everything you need to get online with your new domain.Website Builder
For as little as $3.89 per month you can build your Website online with Website Builder using our easy to use professional templates. Play Video - Demo
Quick Shopping Cart
Build and run your own successful online store in minutes. You're just five easy steps away! Shopping Cart works with Google® and eBay® Play Video
Website Hosting
Everything needed to give your website the high-performance home it deserves. Protect transactions and secure your customer's data with a SSL Certificate
Copyright © 2005 - 2020. All rights reserved.
Privacy Policy
