Free setup! Speak with us anytime: 480-624-2500
Setting up a Welcome Email
Follow along here to use your Autorseponder feature to create a completely automated Welcome Email, that will send to anyone who signs up through your signup form. Exciting!
Step 1. Create your Welcome Email list.
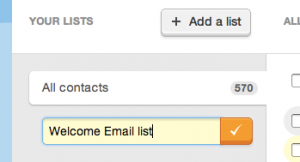
This is in your Subscribers area. Just click on the Subscribers tab, and then on the Add a list button.
Call the list whatever you like, but make sure it's something you'll recognize, later. We'll call it "Welcome Email list" for this demo. Click the checkmark button, to save your list.

Step 2. Create your Signup Form.
Ok, now we have to set up the signup form that you're going to use. If you already have one, great! Just click on Signup Forms at the top of the page, and then on Edit under the specific signup form you want to play with.

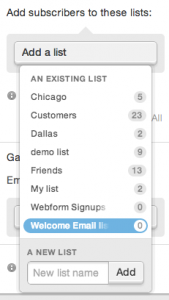
Click on the Add a list dropdown on the right, and choose your new Welcome Email list. Email Marketing will automatically save this change, and you can see that the list has been added right there on the page.
Pro tip: You can create a new list for your Subscribers, right here, using the A New List field, at the bottom of that dropdown.
You will want to make sure to get this signup form out to the world, so people can use it to sign up for your mailings! You can publish the form on your website, or just share the form URL, or connect it with your Facebook business page.
Step 3. Create your Welcome Email Campaign.
Alright, now we have to create the actual Welcome Email Autoresponder that will get sent out to your new subscriber.
If you haven't already, activate the Autoresponder add-on feature, and click on "Go set it up". If you have already activated it, just click on Autoresponders at the top of the page, or under the Addons menu.

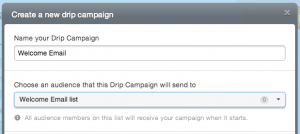
Click on the New Autoresponder button and specify the details asked on that page. In this case, I've called it "Welcome Email".
Make sure to select the new list that you connected to your signup form, in the previous step.
And, you also want to tick the checkbox that's called "Send the first mailing immediately after a user signs up." This way Email Marketing will always send the Welcome Email just as soon as the person signs up through your signup form.
Now, create the campaign and then design that welcome email! (Hint: It's exactly the same as composing a regular Email Marketing campaign.) When it's all perfect, we're ready for the next step...
Step 4. Start your Autoresponder
This is the most exciting step! Now that you have your signup form set up, connected to your new list, and your Autoresponder is connected, designed and ready... all you have left to do is push the start button! You'll see a Start Campaign button in the top right of the screen, or a Run campaign button underneath the campaign preview on the Autoresponder landing page.
You'll need to start your Autoresponder, in order for Email Marketing to send the Welcome Email, automatically. Which brings us to the last step:
Step 5. Watch the automated magic!
Sit back, relax, and watch those new signups roll in. As soon as anyone signs up through your form, that Welcome Email Campaign will send to them, automatically. You don't have to do a thing!
Enjoy :)
Domain Registration
Pay less for website domain names. Register your own .com, .net or .org for as low as $10.18 per year. We have everything you need to get online with your new domain.Website Builder
For as little as $3.89 per month you can build your Website online with Website Builder using our easy to use professional templates. Play Video - Demo
Quick Shopping Cart
Build and run your own successful online store in minutes. You're just five easy steps away! Shopping Cart works with Google® and eBay® Play Video
Website Hosting
Everything needed to give your website the high-performance home it deserves. Protect transactions and secure your customer's data with a SSL Certificate
